Today is the last day in North America to order the Japan-exclusive stamp set New Year Celebration. As I mentioned in an earlier post, I wasn’t sure how to use some of the images, because they are not something I used all the time. (Or see all the time; I have searched on Google and have seen some of these images used on kimono fabric, fabric hangings, fans, etc.)
However, the “bamboo leaves” sparked a memory of something creative we have done as kids, and that led to how I used it on this card.
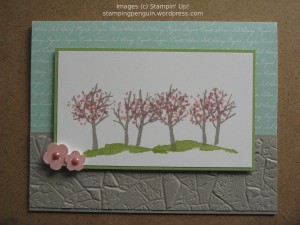
I thought it would be appropriate to combine it with the Lovely Lily Pad images (free! during Sale-a-bration).

Stamp: New Year Celebration (available until today), Lovely Lily Pad (SAB)
Ink: Shaded Spruce, Pool Party, Soft Sea Foam, Gray Granite, Crumb Cake marker, Rococo Rose reinker, Frost White shimmer paint
Paper: Whisper White, Crumb Cake, Pool Party
Accessories: Lily Pad dies (SAB), Rectangled Stitched dies, Aqua painters
Did you see the bamboo that I created? It was really simple to do.

Using the brush end of your Stampin’ Write marker (I used Crumb Cake), make long strokes on your cardstock. It doesn’t have to go all the way across. Just stop where it’s comfortable. Add a mark across where you end (for the “seam” of the bamboo), then continue across the cardstock piece. You may need a 2-3 strokes for each section for the width you want. The variations in color give it natural shading. I love it! If you are not confident you can make straight strokes, just make them shorter. Then, when you are done with creating the stalks, stamp some leaves at the seams. Make sure that if you have more than one stalk, don’t put the seams in the same place. 🙂
The Lovely Lily Pad stamp set is one of the Reversibles style of stamps that Stampin’ Up! is creating. That means you can stamp the detail, flip the stamp, then stamp a solid design. Most are not designed to match exactly. Instead, they “coordinate”.
The lily pad is pretty symmetrical, so the reversible solid, while not perfect, looks pretty decent. For the water designs, I stuck with stamping the detail and reverse in different spots because they ARE different enough. I knew it would bug a little, so I wanted to avoid that feeling.
For the large lotus that I used, the reverse solid image definitely does NOT line up either. I opted to color it another way. It was largely an experiment, but I like how it turned out.

I used a plastic lid from a paper can, such as Pringles (mine was actually bread crumbs), as a palette. I combined two drops of glycerin, one drop of reinker, and Frost White shimmer paint (approximately the same volume as an ink drop). Stir to combine. The glycerin will help the mixture stay fluid and not dry out.
After letting the outline dry a bit, I used an Aqua painter to apply color with the above mixture. I used quick strokes and tried not to repeatedly apply color to the same section. Also, I tried to keep from using too much water. (If you see a lot of water, blot aggressively and start again.) I started my brush stroke at the bottom of the petal and flicked toward the tips. I have seen pictures in which the lotus petals are white at the tips, and I was going for the same effect. I like the sparkles. Definitely a quick way to get cool color.