Since I’ve been pretty AWOL here (enjoying the last bits of my vacation and the nice weather), I’ll post a stamping project AND pics of my painting adventure from the end of February.
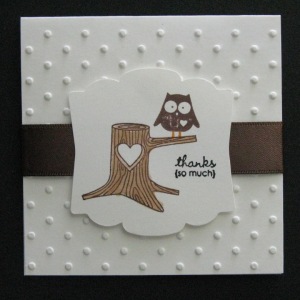
First, the card. I made a few of these thank you note cards recently. I think they came out pretty cute. As you can see, it incorporates a bunch of products from the current Mini.

Stamp set: Love Bandit (Mini), Tiny Tags (Mini)
Ink: Close to Cocoa, Chocolate Chip, StazOn Jet Black, Pumpkin Pie marker, Creamy Caramel marker
Paper: Whisper White
Accessories: Perfect Polka Dots embossing folder (Mini), Sending Love Notes Kisses (Mini), Chocolate Chip satin ribbon (Mini), Stampin’ dimensionals, Mini glue dots
Isn’t it cute? I wanted to show how you can texturize your card base as a background, plus how you can use the Kisses notes on which to stamp your image. No cutting necessary! Well, okay, you have to cut the ribbon to wrap around the note, but that’s it!
I was also able to “eyeball” the owl onto the tree trunk. No Stamp-a-ma-jig needed this time!
Okay, now for the painting adventure. The first class we took was painting a canvas cookbook cover. We totally forgot that we signed up for this class (a sign of old age?)… and we weren’t sure we had all of the right brushes. We sort of did and muddled through everything. All in all, I guess I had fun.
Here’s my cover. I’m going to paint over the left hand side… it’s supposed to be ribbon, but the brush wasn’t cooperating. It didn’t come out well enough to fix, except for covering it up. We got to take home some of the colors, so that’s what I chose.

I had the most fun painting the fruit. You first put down the base color, and it’s just looks like a blob of color. Can’t tell what it is. Once you start putting in the shading and highlighting, you define the individual shapes, and you can start to see what they are. I think I did pretty well for not doing this very often, don’t ya think? (*patting self on back*)


Here’s a picture of what we did in the last class. We took a class from Donna Dewberry, who is the creator of the “One Stroke” method of painting. You basically put two different colors on each side of a flat brush, and depending on how you manipulate the brush, you can use the two colors to create your different items. This is basically my first painting EVER (not counting that recipe book from earlier), and I’m pretty proud of it. Mostly, because I think the middle flower looks like what it’s supposed to be, an iris. What do you think?

I must say, this was pretty addicting… kinda like stamping! It was interesting to note that as long as you’re comfortable at looking at perspective and lighting of objects, it doesn’t really matter what media you are playing in. For instance, you kinda have to think about lighting when you’re watercoloring stamped images, so it’s not that much of a stretch to apply it to painting. It’s just controlling the media, right? And knowing your tools.
p.s. If you want to see pics from the class itself, it’s on Donna’s blog (located here). Look for the March 1 entry. 🙂